Part 1: Getting the DAL parameters
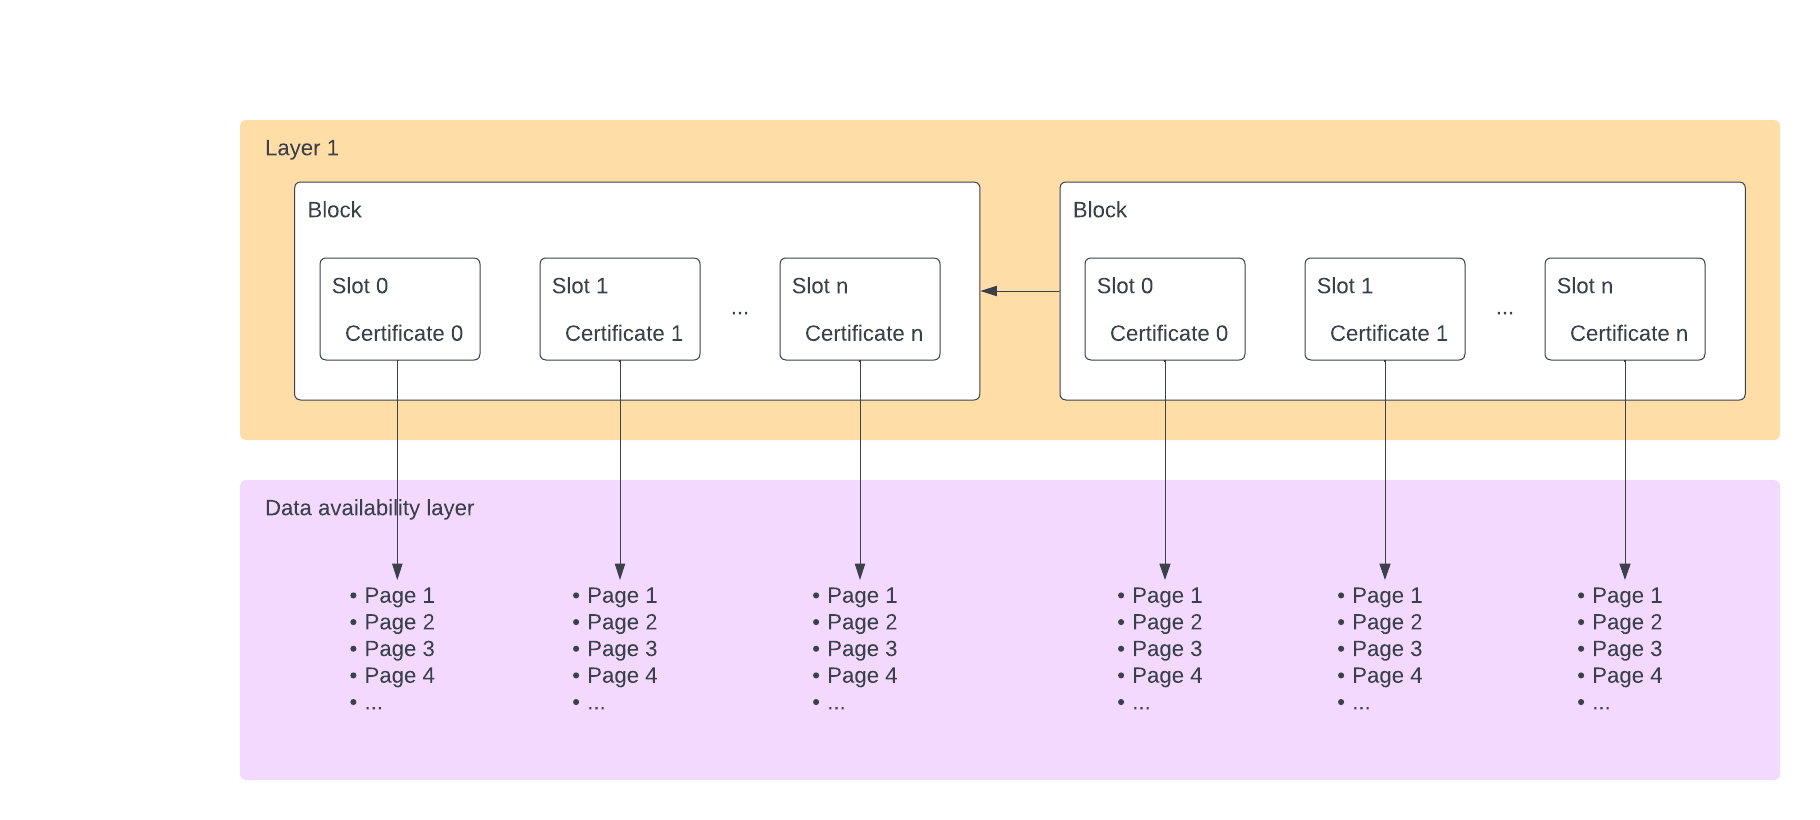
The data availability layer stores information about the available data in layer 1 blocks. Each block has several byte-vectors called slots, each with a maximum size. DAL users can add information about the available data as pages in these slots, as shown in this figure:

The data in a slot is broken into pages to ensure that each piece of data can fit in a single Tezos operation. This data must fit in a single operation to allow the Smart Rollup refutation game to work, in which every execution step of the Smart Rollup must be provable to layer 1. For more information about the refutation game, see Smart Rollups.
When clients add data, they must specify which slot to add it to. Note that because the DAL is permissionless, clients may try to add data to the same slot in the same block. In this case, the first operation in the block takes precedence, which leaves the baker that creates the block in control of which data makes it into the block. Other operations that try to add data to the same slot fail.
The number and size of these slots can change. Different networks can have different DAL parameters. Future changes to the protocol may allow the DAL to resize dynamically based on usage.
Therefore, clients must get information about the DAL before sending data to it. In these steps, you set up a simple Smart Rollup to get the current DAL parameters and print them to the log.
Prerequisites
Before you begin, make sure that you have installed the prerequisites and set up an environment and an account as described in Implement a file archive with the DAL and a Smart Rollup.
Fetching the DAL parameters in a kernel
To get the DAL parameters, you can use built-in functions in the Tezos Rust SDK.
-
In a folder for your project, create a file named
Cargo.tomlwith this code:[package]
name = "files_archive"
version = "0.1.0"
edition = "2021"
[lib]
crate-type = ["cdylib", "lib"]
[dependencies]
tezos-smart-rollup = { version = "0.2.2", features = [ "proto-alpha" ] }As a reminder, the kernel of a Smart Rollup is a WASM program. The
proto-alphafeature is necessary to get access to the functions specific to the DAL because they are not yet released in the main version of the Smart Rollup toolkit. -
Create a file named
src/lib.rsto be the kernel. -
In the
src/lib.rsfile, add this code:use tezos_smart_rollup::{kernel_entry, prelude::*};
pub fn entry<R: Runtime>(host: &mut R) {
let param = host.reveal_dal_parameters();
debug_msg!(host, "{:?}\n", param);
}
kernel_entry!(entry);This function gets the DAL parameters of the currently connected network and prints them to the log.
-
From the folder that contains the
Cargo.tomlfile, run these commands to build the kernel:cargo build --release --target wasm32-unknown-unknown
cp target/wasm32-unknown-unknown/release/files_archive.wasm . -
Run these commands to get the installer kernel, which is a version of the kernel that contains only enough information to download and install the full kernel:
cargo install tezos-smart-rollup-installer
export PATH="${HOME}/.local/bin:${PATH}"
smart-rollup-installer get-reveal-installer \
    -P _rollup_node/wasm_2_0_0 \
    -u files_archive.wasm \
    -o installer.hex
For more information about optimizing the kernel and using installer kernels, see the tutorial Deploy a Smart Rollup.
Now the Smart Rollup is ready to deploy.
Deploying the Smart Rollup and starting a node
Follow these steps to deploy the Smart Rollup to Weeklynet and start a node:
-
Run this command to deploy the Smart Rollup, replacing
$MY_ACCOUNTwith your account alias and$ENDPOINTwith the RPC endpoint:octez-client --endpoint ${ENDPOINT} \
originate smart rollup files_archive from ${MY_ACCOUNT} \
of kind wasm_2_0_0 of type unit with kernel "$(cat installer.hex)" \
--burn-cap 2.0 --force -
Start the node with this command:
octez-smart-rollup-node --endpoint ${ENDPOINT} \
    run observer for files_archive with operators \
    --data-dir ./_rollup_node --log-kernel-debug
For simplicity, this command runs the Smart Rollup in observer mode, which does not require a stake of 10,000 tez to publish commitments.
-
Open a new terminal window and run this command to watch the node's log:
tail -F _rollup_node/kernel.log
The log prints the current DAL parameters, as in this example:
RollupDalParameters { number_of_slots: 32, attestation_lag: 4, slot_size: 65536, page_size: 4096 }
RollupDalParameters { number_of_slots: 32, attestation_lag: 4, slot_size: 65536, page_size: 4096 }
RollupDalParameters { number_of_slots: 32, attestation_lag: 4, slot_size: 65536, page_size: 4096 }
RollupDalParameters { number_of_slots: 32, attestation_lag: 4, slot_size: 65536, page_size: 4096 }
RollupDalParameters { number_of_slots: 32, attestation_lag: 4, slot_size: 65536, page_size: 4096 }
These parameters are:
number_of_slots: The number of slots in each blockslot_size: The size of each slot in bytespage_size: The size of each page in bytesattestation_lag: The number of subsequent blocks in which bakers can attest that the data is available; if enough attestations are available by the time this number of blocks have been created, the data becomes available to Smart Rollups
Setting up a deployment script
In later parts of this tutorial, you will update and redeploy the Smart Rollup multiple times. To simplify the process, you can use this script. To use it, pass the alias of your account in the Octez client:
#!/usr/bin/bash

alias="${1}"

set -e

cargo build --release --target wasm32-unknown-unknown

rm -rf _rollup_node

cp target/wasm32-unknown-unknown/release/files_archive.wasm .

smart-rollup-installer get-reveal-installer -P _rollup_node/wasm_2_0_0 \
  -u files_archive.wasm -o installer.hex

octez-client --endpoint ${ENDPOINT} \
  originate smart rollup files_archive from "${alias}" of kind wasm_2_0_0 \
  of type unit with kernel "$(cat installer.hex)" --burn-cap 2.0 --force

octez-smart-rollup-node --endpoint ${ENDPOINT} \
  run observer for files_archive with operators --data-dir _rollup_node \
  --dal-node http://localhost:10732 --log-kernel-debug
If you run this script and see an error that says that the file was not found, update the first line of the script (the shebang) to the path to your shell interpreter.
For example, if you are using the Tezos Docker image, the path is /bin/sh.
In the next section, you will get information about the state of slots in the DAL. See Part 2: Getting slot information.